Mixpanel is an phenomenal web analytics platform. It happens to be one we use at data.world and our favorite feature is JQL.
JQL — JavaScript Query Language — uses the full power of a robust and popular programming language, JavaScript, to let you analyze your data in Mixpanel. It was designed for performance and flexibility so that developers and data scientists can pull the most valuable insights from their data with ease ‐ no matter how complex the question is.
In other words, JQL allows you to query your raw Mixpanel data using Javascript and create any data extracts you need to help your team get to insights faster.
However powerful, JQL is not easy to learn. That is the reason why those of us who can use it share the extracted data on data.world for the benefit of all our team members. We automate that process leveraging data.world’s recently released advanced sync options and Mixpanel’s API.
Here is how you can do that too.
Step 1: Write a JQL query
Use Mixpanel’s JQL editor to author your query. The tool is intuitive and allows you to easily spot syntax issues and test your script.
Find it under the Apps menu, as seen below:

For this tutorial, we will adapt one of Mixpanel’s JQL examples. This query will extract the 10 most popular web domains among our users’ e-mail addresses:
// helper function to pluck out the domainfunction getEmailDomain(user) {
var email = user.properties["$email"];
if (!email) { return undefined; }
  pos = email.indexOf('@');
if (pos < 0) { return undefined; }
return email.substr(pos + 1);
}

function main() {
return People()
  .groupBy([getEmailDomain], mixpanel.reducer.count())
  .reduce(mixpanel.reducer.top(10))
  .flatten() // flatten the JSON for data.world
  .map(function(item) {
    return { "domain": item.key[0], "count": item.value}
  });
}
Step 2: Understand how to execute JQL via API
Once you are satisfied with your JQL query, let’s understand what it would look like to execute it via an HTTP API.
As explained in Mixpanel docs, here is what you need to know before you can compose a request:
Endpoint URL:
https://mixpanel.com/api/2.0/jql
Request method:
POST
Content-type:
application/x-www-form-urlencoded
Body:
script
andparams
(optional)Authentication:
BASIC
(where username is your Mixpanel API secret and password is to be left blank)
If you are so inclined, you can test it using curl — otherwise, skip to Step 3:
# replace YOUR_API_SECRET with your own API secret
$ export MP_API_SECRET = "YOUR_API_SECRET"
$ export JQL_SCRIPT='
function getEmailDomain(user) {
  var email = user.properties["$email"];
  if (!email) { return undefined; }
  pos = email.indexOf("@");
  if (pos < 0) { return undefined; }
  return email.substr(pos + 1);
}
function main() {
  return People()
  .groupBy([getEmailDomain], mixpanel.reducer.count())
  .reduce(mixpanel.reducer.top(10))
  .flatten() // flatten the JSON for data.world
  .map(function(item) {
    return { "domain": item.key[0], "count": item.value}
  });
}'
$ curl https://mixpanel.com/api/2.0/jql
    -X POST
    -H 'Content-Type: applicatoin/x-www-form-urlencoded'
    --data-urlencode script=$JQL_SCRIPT
    -u $MP_API_SECRET:
Final step: Import data into data.world
Now that you know what parameters are required to execute your JQL query via API, let’s add the data to a data.world dataset.
First, choose “Add from URL” to get started:

Add from URL
Next, enter the API URL and choose a name for your file:

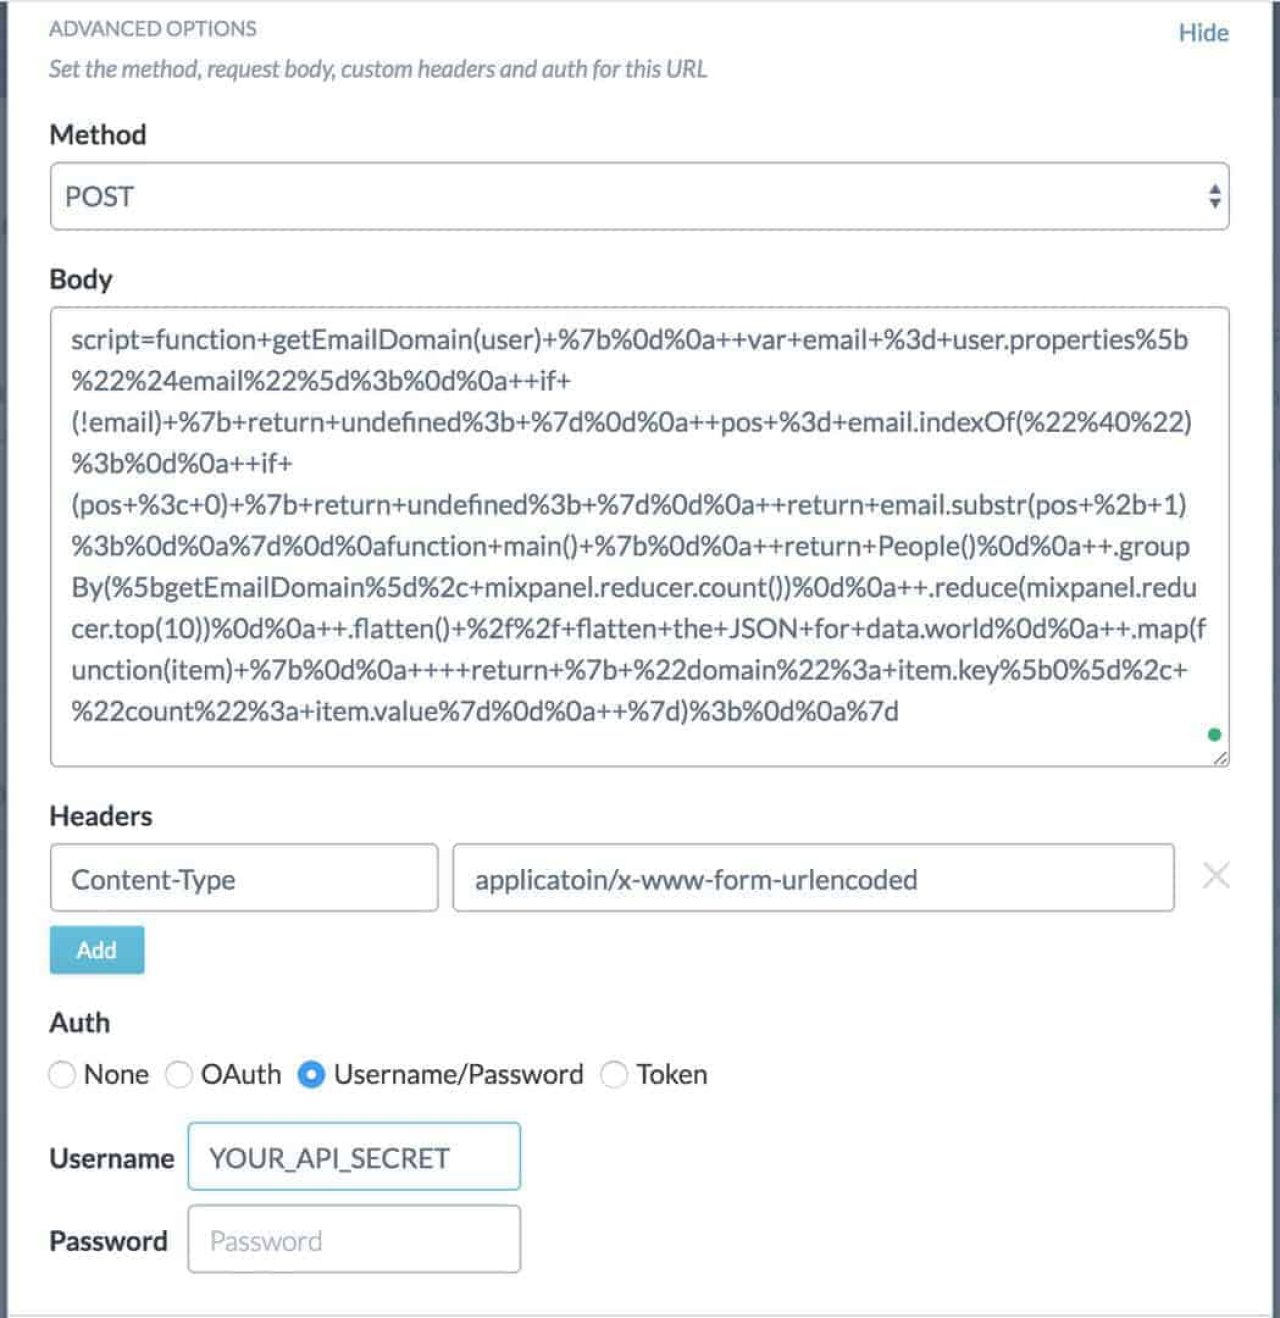
Finally, expand the “Advanced Options” section, and fill out with form with the relevant parameters (remember to replace YOUR_API_SECRET with your Mixpanel API Secret):

Note that Mixpanel requires the body of the request to be encoded. For that reason, the body in the example above looks different from the original script. We have used decode.org, to perform the encoding. Try it here, it’s pretty handy!
You are done! Once you complete this step, data.world will make the API call on your behalf and store the results in a file called
top_10.json
.
Now, if you want to data.world to refresh your file automatically, head on the the Settings section of you dataset and look for “Automatic sync options”.
Looking for more great ways to get your data in data.world? Read about our latest updates.
Want to make your data projects easier/faster/better? Streamline your data teamwork with our Modern Data Project Checklist!